Laman

New

a

Tampilkan postingan dengan label android. Tampilkan semua postingan

Minggu

understanding android build system out directory

The android build system keeps a clean seperation of source and output. All intermediates and final output are placed in the directory named out. So, the simple way to fully clean a build is deleting the out directory.
The hierarchy of the out directory is shown below:
out/
|-- host/ # the directory containing all tools and libraries of build system
-- target/product/generic/ # the root of this product's out directory
|-- data # the directory for creating data file system image
|-- obj # the root directory of build process
| |-- APPS # android application
| |-- ETC
| |-- EXECUTABLES # the root directory containing all native executable build output
| |-- include
| |-- JAVA_LIBRARIES
| |-- lib # the directory containing copies of stripped shared libraries,
| | # other modules will search this directory for libraries to resolve linkage
| |-- PACKAGING
| |-- SHARED_LIBRARIES # the root directory containing all native shared library build output
| | |-- {LOCAL_MODULE_NAME}_intermediates # the direcotry containing all build output for {LOCAL_MODULE_NAME} module
| | | # this naming convention is followed by all subdirectories of module
| | -- LINKED # the directory containing the linked binary file, e.g, .so file
| -- STATIC_LIBRARIES # the root directory containing all native static library build output
|-- root # the directory for creating root file system, ramdisk image
| |-- data
| |-- dev
| |-- proc
| |-- sbin
| |-- sys
| -- system
|-- symbols # the directory contains all binary images that has debugging symbols
| |-- data
| |-- sbin
| -- system
-- system # the directory for creating system.img, where most of appications and libraries reside
|-- app
|-- bin
|-- etc
|-- fonts
|-- framework
|-- lib
|-- media
|-- tts
|-- usr
-- xbin
Under the out/target/product/generic/obj directory, there are several subdirectories, APPS, EXECUTABLES, SHARED_LIBRARIES, STATIC_LIBRARIES. They contain build output for modules of different type, java application, native executable, shared libraries and static libraries, respectively. Under the module type's directory, there is a directory for each module of corresponding type, named with the module's name catenating _intermediates. So, when we need to clean a specific module, we can simply delete the intermediate directory for the module.
For example, in the Android.mk for stlport, there is a LOCAL_MODULE defined as libstlport, which is a shared library (by including $(BUILD_SHARED_LIBRARY)). The output of this module will be placed in SHARED_LIBRARIES/libstlport_intermediates directory. The linker will generate the final shared library in the SHARED_LIBRARIES/libstlport_intermediates/LINKED directory.
After a module has been compiled the linked, it's to be stripped and copied to directory for creating file system image. The build system doesn't perform stripping in place. Instead, it will first copy the file with debugging symbol information (the file under LINKED directory) to correct place in symbols directory. Then strip the file and save in intermediate directory (for executable) or obj/lib directory (for shared library), meanwhile, the file without symbol and the file with symbol are associated with 'objcopy --add-gnu-debuglink' command. Finally, the stripped file will be copied to system directory.
Once all modules are built, the system directory should have been populated with necessary files. The build system will create three file system images, ramdisk.img, userdata.img, and system.img with system, root and data as source directories respectively. The default choice of file system is yaffs2.

communication between android widget and application

Widget is a convienent feature in android that gives users quick access to frequently used application functions. A example is the power control widget. It helps us quickly toggling accessories such as WIFI, GPS power to conserve battery, without tedious operations.
android power control widget
When we plan to provide widget in our own application, an important thing to think about is the communication model between the widget and application. In a simiplified manner, the commucation model is shown below.
communication model diagram
The widget is shown on home screen(which is a AppWidgetHost), and user can interact(e.g., touch) with the widget. The result of the interaction is either showing an activity to the user to display more information, or controlling the state of a background service. Meanwhile, the background service may proactively update the widget to inform user current state. The communication model is bidirectional.

Launch activity from widget

To launch an activity from widget, we can use RemoteViews's setOnClickPendingIntent method to set a intent for the target button. Once the button is clicked, the intent will be sent to start desired activity. The snippet below shows how to do this in AppWidgetProvider.
 1 import android.app.PendingIntent;
 2 
 3 import android.appwidget.AppWidgetManager;
 4 import android.appwidget.AppWidgetProvider;
 5 
 6 import android.content.Context;
 7 import android.content.Intent;
 8 
 9 import android.widget.RemoteViews;
10 
11 public class GestureAppWidgetProvider extends AppWidgetProvider {
12 
13         public void onUpdate(Context context, AppWidgetManager appWidgetManager, int[] appWidgetIds) {
14             final int N = appWidgetIds.length;
15 
16             // Perform this loop procedure for each App Widget that belongs to this provider
17             for (int i=0; i<N; i++) {
18                 int appWidgetId = appWidgetIds[i];
19 
20                 // Create an Intent to launch Activity
21                 Intent intent = new Intent(context, MainActivity.class);
22                 PendingIntent pendingIntent = PendingIntent.getActivity(context, 0, intent, 0);
23 
24                 // Get the layout for the App Widget and attach an on-click listener
25                 // to the button
26                 RemoteViews views = new RemoteViews(context.getPackageName(), R.layout.appwidget);
27                 views.setTextColor(R.id.startRecord, Color.GREEN);
28                 views.setOnClickPendingIntent(R.id.startRecord, pendingIntent);
29 
30                 // Tell the AppWidgetManager to perform an update on the current app widget
31                 appWidgetManager.updateAppWidget(appWidgetId, views);
32             }
33         }
34 }

Send message to service from widget

The skeleton of code to send message to a service is pretty much the same as the snippet above. The change we need to make is substitute PendingIntent.getActivity with PendingIntent.getBroadCast. The result is once we clicked the button, a broadcast Intent will be sent, and our AppWidgetProvider(which is a subclass of BroadcastReceiver) will get this intent. Thie AppWidgetProvider runs in our application's process, so it can send the message to our service with StartService.
 1 public class WeatherWidgetProvider extends AppWidgetProvider {
 2     public static String REFRESH_ACTION = "com.example.android.weatherlistwidget.REFRESH";
 3 
 4     @Override
 5     public void onReceive(Context ctx, Intent intent) {
 6         final String action = intent.getAction();
 7         if (action.equals(REFRESH_ACTION)) {
 8             // send message to background service via startService here
 9             // ..............
10         }
11         super.onReceive(ctx, intent);
12     }
13 
14     @Override
15     public void onUpdate(Context context, AppWidgetManager appWidgetManager, int[] appWidgetIds) {
16         for (int i = 0; i < appWidgetIds.length; ++i) {
17             final RemoteViews rv = new RemoteViews(context.getPackageName(), R.layout.widget_layout);
18             rv.setRemoteAdapter(appWidgetIds[i], R.id.weather_list, intent);
19 
20             // Set the empty view to be displayed if the collection is empty.  It must be a sibling
21             // view of the collection view.
22             rv.setEmptyView(R.id.weather_list, R.id.empty_view);
23 
24             // Bind the click intent for the refresh button on the widget
25             final Intent refreshIntent = new Intent(context, WeatherWidgetProvider.class);
26             refreshIntent.setAction(WeatherWidgetProvider.REFRESH_ACTION);
27             final PendingIntent refreshPendingIntent = PendingIntent.getBroadcast(context, 0,
28                     refreshIntent, PendingIntent.FLAG_UPDATE_CURRENT);
29             rv.setOnClickPendingIntent(R.id.refresh, refreshPendingIntent);
30 
31             appWidgetManager.updateAppWidget(appWidgetIds[i], rv);
32         }
33         super.onUpdate(context, appWidgetManager, appWidgetIds);
34     }
35 }

Update widget from service

To update a widget from service, we can send a broadcast message from the background service to AppWidgetProvider. Once the AppWidgetProvider receives the message, it tries to fetch current state and calls notifyAppWidgetViewDataChanged function to refresh the widget.
public void onReceive(Context ctx, Intent intent) {
    final String action = intent.getAction();
    if (action.equals(SHOW_NEW_DATA_ACTION)) {
        final AppWidgetManager mgr = AppWidgetManager.getInstance(context);
        final ComponentName cn = new ComponentName(context, WeatherWidgetProvider.class);
        mgr.notifyAppWidgetViewDataChanged(mgr.getAppWidgetIds(cn), R.id.weather_list);
    }
    super.onReceive(ctx, intent);
}

Reference:

android WeatherListWidget sample
Introducing home screen widgets and the AppWidget framework
android appwidget source code
android appwidget service source code

Rabu

solve "Host 'awk' tool is outdated." problem for ndk

While using ndk-build command in ndk r7 to build a project on 32-bit ubuntu, I got this error:
Android NDK: Host 'awk' tool is outdated. Please define HOST_AWK to point to Gawk or Nawk !

It didn't work even if I add the HOST_AWK environment variable and point it to gawk.
There are two reasons:
  1. The prebuilt awk tool comes with ndk r7 is compiled for 64bit and can't run on 32bit os
  2. The HOST_AWK environment variable is overridden by {ndk_root}/build/core/init.mk to point to the prebuilt awk comes with ndk

To solve this problem, remove {ndk_root}/prebuilt/linux-x86/bin/awk. Now the ndk-build script will use correct awk tool.

Sabtu

adepends.py, utility for analysing android module dependency

There are thousands of modules within android system. They form a very complicated dependency graph. When we want to learn about a particular module in android system, it's not easy to find out where modules that are dependent on by the module we mainly focus on are located. To make this task easier, I wrote adepends.py, which can be used to analysis dependency relationship between modules. It's capable of:
  1. List modules defined within a directory
  2. Generate a graphviz dot based diagram file to show dependency relationship
To show which modules are defined in a directory, we can use this command: "adepends.py -l DIRECTORY_NAME". For example, if we run "adepends.py -l external/protobuf/" command, we get below output:
libprotobuf-java-2.3.0-micro
libprotobuf-cpp-2.3.0-lite
host-libprotobuf-java-2.3.0-micro
libprotobuf-cpp-2.3.0-full
host-libprotobuf-java-2.3.0-lite
aprotoc
libprotobuf-java-2.3.0-lite

To generate a dependency diagram for a particular module, we can use this command: "adepends.py -o output.dot -m module_name". For example, if we're interested in the dependency diagram for charger module,  we can use this command: "adepends.py -o output.dot -m charger". After the command finished, we have output.dot in current directory. Then we run "dot -Tpng -ooutput.png output.dot" to generate a png file for the diagram. And the diagram is shown below:

Each ellipse represents a module, the top line shows the module name, and the bottom line shows the directory that the module is defined. The arrowed edge represents the dependency relationship between two modules.

stream audio via udp on android

In this post, I tried to play small audio data chunks with AudioTrack to show the feasibility of streaming audio. It's not straightforward enough. So I updated the sample code to actually transfer audio data with udp.
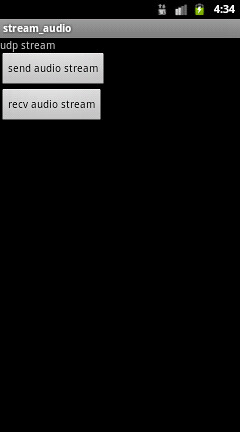
As the image below shows, the application is not too complicated.


The two buttons will each create a new thread to send and recv audio data respectively. And the sender will read audio data from the file /data/1.wav. Then, it sends the data to udp port 2048 on localhost. The receiver reads on 2048 port and feed data received to AudioTrack object.
Full code is available at:
http://code.google.com/p/rxwen-blog-stuff/source/browse/trunk/android/streaming_audio/src/rmd/media/StreamingAudio/UdpStream.java

Senin

ease android stacktrace examination in vim with agdb

Continue the post view call stack of crashed application on android.
The agdb tool is able to convert PC register to source file information, but not convenient enough. After agdb outputs source file information, we still need to open the source file in vim and jump to the corresponding line manually.
Now agdb tool can generate a vim specific error file for the stacktrace to help us jump to source code directly.
Still consider the stacktrace below:


22 F/ASessionDescription(   33): frameworks/base/media/libstagefright/rtsp/ASessionDescription.cpp:264 CHECK_GT( end,s) failed:  vs.
23 I/DEBUG   (   30): *** *** *** *** *** *** *** *** *** *** *** *** *** *** *** ***
24 I/DEBUG   (   30): Build fingerprint: 'generic/generic/generic:2.3.1/GINGERBREAD/eng.raymond.20101222.130550:eng/test-keys'
25 I/DEBUG   (   30): pid: 33, tid: 450  >>> /system/bin/mediaserver <<<
26 I/DEBUG   (   30): signal 11 (SIGSEGV), code 1 (SEGV_MAPERR), fault addr deadbaad
27 I/DEBUG   (   30):  r0 deadbaad  r1 0000000c  r2 00000027  r3 00000000
28 I/DEBUG   (   30):  r4 00000080  r5 afd46668  r6 40806c10  r7 00000000
29 I/DEBUG   (   30):  r8 8031db1d  r9 0000fae0  10 00100000  fp 00000001
30 I/DEBUG   (   30):  ip ffffffff  sp 40806778  lr afd19375  pc afd15ef0  cpsr 00000030
31 I/DEBUG   (   30):          #00  pc 00015ef0  /system/lib/libc.so
32 I/DEBUG   (   30):          #01  pc 00001440  /system/lib/liblog.so
33 I/DEBUG   (   30):
34 I/DEBUG   (   30): code around pc:
35 I/DEBUG   (   30): afd15ed0 68241c23 d1fb2c00 68dae027 d0042a00
36 I/DEBUG   (   30): afd15ee0 20014d18 6028447d 48174790 24802227
37 I/DEBUG   (   30): afd15ef0 f7f57002 2106eb56 ec92f7f6 0563aa01
38 I/DEBUG   (   30): afd15f00 60932100 91016051 1c112006 e818f7f6
39 I/DEBUG   (   30): afd15f10 2200a905 f7f62002 f7f5e824 2106eb42
40 I/DEBUG   (   30):
41 I/DEBUG   (   30): code around lr:
42 I/DEBUG   (   30): afd19354 b0834a0d 589c447b 26009001 686768a5
43 I/DEBUG   (   30): afd19364 220ce008 2b005eab 1c28d003 47889901
44 I/DEBUG   (   30): afd19374 35544306 d5f43f01 2c006824 b003d1ee
45 I/DEBUG   (   30): afd19384 bdf01c30 000281a8 ffffff88 1c0fb5f0
46 I/DEBUG   (   30): afd19394 43551c3d a904b087 1c16ac01 604d9004
47 I/DEBUG   (   30):
48 I/DEBUG   (   30): stack:
49 ........................
92 I/DEBUG   (   30):     408067e4  6f697470
93 I/BootReceiver(   75): Copying /data/tombstones/tombstone_09 to DropBox (SYSTEM_TOMBSTONE)

We run this command to convert it to vim error file:
agdb.py -v < tombstone_01.txt > vim_error_file
# the -v argument tells agdb to generate a vim error file

Then in vim, we run :cg vim_error_file to load the error file to vim's quickfix buffer.
After the error file is loaded, we run :cw command in vim to examine the call stack. It's shown below:

1 pid: 33, tid: 450  >>> /system/bin/mediaserver <<<
2 /path_to_android_src_root/bionic/libc/unistd/abort.c:82: #00 __libc_android_abort
3 /path_to_android_src_root/system/core/liblog/logd_write.c:235: #01 __android_log_assert
Now we can focus on the line that we'd like to further investigate, and press enter. Vim will bring us the the exact line that the error corresponds to.

The idea of the feature is very simple. As we vim users know, vim is able to recognize lots of compilers' error message. The agdb tool converts the format of stacktrace to gcc compiler's error format, then vim can load the output to quickfix and associate lines with corresponding source code.

Jumat

fix "bad class file error" android build error

I got the error below while building android source code:
packages/apps/Calculator/src/com/android/calculator2/CalculatorDisplay.java:19: cannot access android.content.Context
bad class file: android/content/Context.class(android/content:Context.class)

The error is caused by using an incorrect version of jdk. Google recommend using sun-java6-jdkto build android source code. On my pc, besides sun jdk that installed, openjdk and fastjar are installed by default. And they're used to build android, rather than sun-jdk. To make sure that sun jdk is used, I used commands below to select sun jdk.

sudo update-alternatives --config java
sudo update-alternatives --config jar

Typical output is shown below, and android build successfully after I select sun jdk.
There are 2 choices for the alternative jar (providing /usr/bin/jar).


  Selection    Path                             Priority   Status
------------------------------------------------------------
  0            /usr/bin/fastjar                  100       auto mode
  1            /usr/bin/fastjar                  100       manual mode
* 2            /usr/lib/jvm/java-6-sun/bin/jar   63        manual mode

Senin

access android source via https protocol

Update: no need to use this trick anymore, since google has changed the default protocol to https.


repo is a good tool for android source tree management. It manages all git repositories for all android subprojects. By default, it clones these project via git: protocol, which is more efficient to work with than http. But the git: protocol accesses 9418 port, which may be blocked by firewalls, especially when we're using it within a restricted network environment. In this case, it's desired to be able to access android source tree with http: protocol.
The site kernel.org that hosts android source code supports https: protocol, so we can change the config file in .git folder for each android subproject to force using https: protocol. The bash command below does the job:
find -regex ".*.git/config" -exec sed -i s/git:/https:/ {} \;
To change it back to git protocol, exchange git: and https: in the command.

view call stack of crashed application on android

On android, when a process crashes in native code, the call stack of the process will be saved to a log file in /data/tombstomes/, and written to logcat as well. The information is helpful for debugging.
Unfortunately, the call stack doesn't show in human readable format, file name, function name. Instead, it's shown as module name (e.g., libc.so) and memory address of the instruction. We can use addr2line to translate the address to corresponding file name and function name if we have the binary of the module that contains symbol information.
To make it easier to use, this function is included in agdb tool (see here for more). We can use "agdb.py -r -e module_name address" to find out the function name of specified address within the module.

When we have a long call stack, instead of running the command above for each line in the call stack manually, we can feed the whole call stack to agdb through pipe and get the full resolved call stack. For example, use  "adb logcat | agdb.py -r" command for adb logcat output with below contents:

22 F/ASessionDescription(   33): frameworks/base/media/libstagefright/rtsp/ASessionDescription.cpp:264 CHECK_GT( end,s) failed:  vs.
23 I/DEBUG   (   30): *** *** *** *** *** *** *** *** *** *** *** *** *** *** *** ***
24 I/DEBUG   (   30): Build fingerprint: 'generic/generic/generic:2.3.1/GINGERBREAD/eng.raymond.20101222.130550:eng/test-keys'
25 I/DEBUG   (   30): pid: 33, tid: 450  >>> /system/bin/mediaserver <<<
26 I/DEBUG   (   30): signal 11 (SIGSEGV), code 1 (SEGV_MAPERR), fault addr deadbaad
27 I/DEBUG   (   30):  r0 deadbaad  r1 0000000c  r2 00000027  r3 00000000
28 I/DEBUG   (   30):  r4 00000080  r5 afd46668  r6 40806c10  r7 00000000
29 I/DEBUG   (   30):  r8 8031db1d  r9 0000fae0  10 00100000  fp 00000001
30 I/DEBUG   (   30):  ip ffffffff  sp 40806778  lr afd19375  pc afd15ef0  cpsr 00000030
31 I/DEBUG   (   30):          #00  pc 00015ef0  /system/lib/libc.so
32 I/DEBUG   (   30):          #01  pc 00001440  /system/lib/liblog.so
33 I/DEBUG   (   30):
34 I/DEBUG   (   30): code around pc:
35 I/DEBUG   (   30): afd15ed0 68241c23 d1fb2c00 68dae027 d0042a00
36 I/DEBUG   (   30): afd15ee0 20014d18 6028447d 48174790 24802227
37 I/DEBUG   (   30): afd15ef0 f7f57002 2106eb56 ec92f7f6 0563aa01
38 I/DEBUG   (   30): afd15f00 60932100 91016051 1c112006 e818f7f6
39 I/DEBUG   (   30): afd15f10 2200a905 f7f62002 f7f5e824 2106eb42
40 I/DEBUG   (   30):
41 I/DEBUG   (   30): code around lr:
42 I/DEBUG   (   30): afd19354 b0834a0d 589c447b 26009001 686768a5
43 I/DEBUG   (   30): afd19364 220ce008 2b005eab 1c28d003 47889901
44 I/DEBUG   (   30): afd19374 35544306 d5f43f01 2c006824 b003d1ee
45 I/DEBUG   (   30): afd19384 bdf01c30 000281a8 ffffff88 1c0fb5f0
46 I/DEBUG   (   30): afd19394 43551c3d a904b087 1c16ac01 604d9004
47 I/DEBUG   (   30):
48 I/DEBUG   (   30): stack:
49 ........................
92 I/DEBUG   (   30):     408067e4  6f697470
93 I/BootReceiver(   75): Copying /data/tombstones/tombstone_09 to DropBox (SYSTEM_TOMBSTONE)

we get:


22 F/ASessionDescription(   33): frameworks/base/media/libstagefright/rtsp/ASessionDescription.cpp:264 CHECK_GT( end,s) failed:  vs.
23 I/DEBUG   (   30): *** *** *** *** *** *** *** *** *** *** *** *** *** *** *** ***
24 I/DEBUG   (   30): Build fingerprint: 'generic/generic/generic:2.3.1/GINGERBREAD/eng.raymond.20101222.130550:eng/test-keys'
25 I/DEBUG   (   30): pid: 33, tid: 450  >>> /system/bin/mediaserver <<<
26 I/DEBUG   (   30): signal 11 (SIGSEGV), code 1 (SEGV_MAPERR), fault addr deadbaad
27 I/DEBUG   (   30):  r0 deadbaad  r1 0000000c  r2 00000027  r3 00000000
28 I/DEBUG   (   30):  r4 00000080  r5 afd46668  r6 40806c10  r7 00000000
29 I/DEBUG   (   30):  r8 8031db1d  r9 0000fae0  10 00100000  fp 00000001
30 I/DEBUG   (   30):  ip ffffffff  sp 40806778  lr afd19375  pc afd15ef0  cpsr 00000030
31 I/DEBUG   (   30):          #00  pc 00015ef0  /system/lib/libc.so
32 I/DEBUG   (   30):          #00  __libc_android_abort: abort.c:82
33 I/DEBUG   (   30):          #01  pc 00001440  /system/lib/liblog.so
34 I/DEBUG   (   30):          #01  __android_log_assert: logd_write.c:235
35 I/DEBUG   (   30):
36 I/DEBUG   (   30): code around pc:
37 I/DEBUG   (   30): afd15ed0 68241c23 d1fb2c00 68dae027 d0042a00
38 I/DEBUG   (   30): afd15ee0 20014d18 6028447d 48174790 24802227
39 I/DEBUG   (   30): afd15ef0 f7f57002 2106eb56 ec92f7f6 0563aa01

Similarly, we copy a tombstone file to our development pc, and use "cat tombstone_01.txt | agdb.py -r" command to resolve call stack addresses in the tombstone log file.

Rabu

utility for debugging android native application

agdb is a utility aims to ease the task of debugging android native application. Its working mechanism is similar to ndk-gdb. But it's intended to assist debugging native applications in android source tree, not for application created with ndk.

It does following things for us automatically:
  1. find the binary that contains symbol data of target process
  2. attach gdbserver to the target process on device, or start the target process under gdbserver if the process isn't already running
  3. start gdb client and set correct symbol file search path
How to use it
  prerequirements
agdb must know the root directory of android source code. We can tell it by passing --android-src-root argument or setting ANDROID_SRC_ROOT environment variable.
agdb interacts with target device through adb, so the device must be accessible through adb.
gdb client communicates gdbserver through tcp protocol (tcp port 7890 by default). If using emulator, we need to forward or redir tcp ports in advance.

 usage
After all prequirements are met, we can run "agdb.py process_name" to debug desired application. For example, if we want to debug mediaserver application, simply run agdb.py mediaserver.
If we want to debug code in native part of a dalvik (java) application, we can use:
agdb.py --dalvik [package_name (for example, com.android.launcher)]


Limitation
It doesn't work on Windows.
It starts gdbserver in network communication mode, serial port isn't supported.
It doesn't support dalvik application.

Reference
http://source.android.com/porting/debugging_gdb.html

Minggu

port exosip to android

Port exosip to android platform isn't a difficult task because exosip doesn't rely on any special system calls that aren't available on android. It only requires osip to compile, which can also be easily ported.
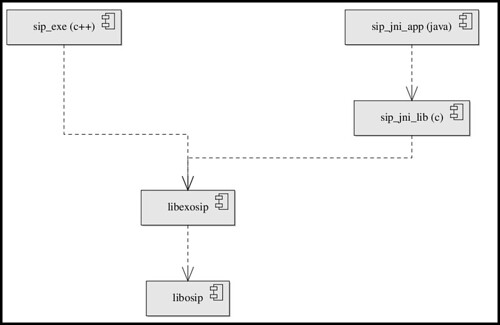
As an example, I created two applications to run against exosip lib. One is a native application that can run in android shell, the other is an java application that interact with exosip through jni. The dependency relationship between modules is:

The diagram below depicts the organization of files. They're organized this way so that they can be compiled through android ndk build system.
To comply with ndk build system's requirements, we create a directory named jni under sip_jni and sip_exe module, and place actual source file there. The Android.mk and Application.mk (optional) are placed in the jni directory as well. Keeping files this way, we can issue ndk-build command right in sip_jni or sip_exe directories to compile applications.
Note that we don't create jni directory for libosip and libexosip, their Android.mk is placed directly under libosip and libexosip directories. This is because they are dependent on by application modules. We don't need compile them directly, instead, the build system will build them automatically while building applications. In order to help build system find libosip and libexosip, we must set NDK_MODULE_PATH environment variable to the directory that directly containing  libosip and libexosip. The build system will search for them based on directory name, so their names matter.

To port exosip to android, the essential task is to create the Android.mk file, which specifies source files, c flags, ld flags, dependent libraries. We define HAVE_TIME_H and HAVE_SYS_SELECT_H to compile exosip successfully. And we define ENABLE_TRACE and OSIP_MT to enable logging and multi-threading. In the last line, $(call import-module,libosip) tells the build system that exosip depends on osip, and all header files exported by osip (LOCAL_EXPORT_C_INCLUDES:=$(LOCAL_C_INCLUDES))  will be included by exosip automatically. 
import-module is a feature that isn't available in the build system in android source tree. It enables us organizing our projects in arbitrary manner. For example, we can place libosip and libexosip directories in another directory. The build system can still find them as long as NDK_MODULE_PATH is set to the directory containing them. It's much more flexible than specifying dependency relationship with relative path.

Sample:
The sample for this post is available at:
http://code.google.com/p/rxwen-blog-stuff/source/browse/trunk/android/exosip_sample/
It shows how to:
  1. use ndk build system
  2. use stl in c++ code
  3. create a very basic exosip application
  4. call native code from java
  5. call java code from native code
References:
ndk document
exosip user manual

Selasa

tools for working with android jni

When we make use of jni on android, it's a error-prone task to manually write the native function name for a given java native function. Though there are rules for us to follow, no one would like to memorize that. javah to the rescue.
For example, for the following java class with a native method.
 1 package com.rmd.jni;

 2

 3 import android.app.Activity;

 4 import android.os.Bundle;

 5

 6 public class Main extends Activity

 7 {

 8     /** Called when the activity is first created. */

 9     @Override

10     public void onCreate(Bundle savedInstanceState)

11     {

12         super.onCreate(savedInstanceState);

13         setContentView(R.layout.main);

14     }

15

16     public native boolean JniMethod(int a);

17 }


We can follow steps below to generate a native header file:
  1. cd to project root folder
  2. Compile the project, e.g., using ant debug command
  3. run javah -jni -classpath bin/classes -d jni com.rmd.jni.Main (this command generates a native header file in jni directory, for com.rmd.jni.Main class)

And we get a header file com_rmd_jni_Main.h with content below:

 1 /* DO NOT EDIT THIS FILE - it is machine generated */

 2 #include <jni.h>

 3 /* Header for class com_rmd_jni_Main */

 4

 5 #ifndef _Included_com_rmd_jni_Main

 6 #define _Included_com_rmd_jni_Main

 7 #ifdef __cplusplus

 8 extern "C" {

 9 #endif

10 /*

11  * Class:     com_rmd_jni_Main

12  * Method:    JniMethod

13  * Signature: (I)Z

14  */

15 JNIEXPORT jboolean JNICALL Java_com_rmd_jni_Main_JniMethod

16   (JNIEnv *, jobject, jint);

17

18 #ifdef __cplusplus

19 }

20 #endif

21 #endif


There are cases that we need to provide a method signature of a java function to the GetMethodID function in native code. javap can help us.
Consider the java class below, within which exists a JniCallback method. And this method is meant to be called from native code.

 1 package com.rmd.jni;

 2

 3 import android.app.Activity;

 4 import android.os.Bundle;

 5

 6 public class Main extends Activity

 7 {

 8     /** Called when the activity is first created. */

 9     @Override

10     public void onCreate(Bundle savedInstanceState)

11     {

12         super.onCreate(savedInstanceState);

13         setContentView(R.layout.main);

14     }

15

16     public boolean JniCallback(int a);

17 }

After it's compiled, we can use javap -classpath bin/classes -s -p com.rmd.jni.Main command to find out the signature of JniCallback method. Shown below.
Compiled from "Main.java"
public class com.rmd.jni.Main extends android.app.Activity{
public com.rmd.jni.Main();
Signature: ()V
public void onCreate(android.os.Bundle);
Signature: (Landroid/os/Bundle;)V
public native boolean JniMethod(int);
Signature: (I)Z
}

Reference:
Java Native Interface Programming

Rabu

learning opencore through unit testing

Android 2.3 gingerbread was officially released. A big improvement is this version is in media framework, as stated in platform highlights:

Media Framework

  • New media framework fully replaces OpenCore, maintaining all previous codec/container support for encoding and decoding.
  • Integrated support for the VP8 open video compression format and the WebM open container format
  • Adds AAC encoding and AMR wideband encoding

I'm not able to find out what is the replacement for opencore yet. But before opencore is obsoleted, I still would like to share my way of learning opencore. This might be helpful for those who still have to work on legacy android platforms.

Opencore is a complicated multimedia framework. An effective way I thought a bit easier to learn it is looking at its unit testing code and debugging unit testing application. The advantages include:
  1. The code can be compiled as x86 executable, so we can run it on our pc directly, rather than on a android device or emulator.
  2. The application can be debugged with gdb 
  3. Unit tests demonstrate the simplest usage of opencore. It's particularly useful for a fresh learner to get started.
  4. Test cases each have its own concentration, and is easier to follow.
So, if we use unit testing code as a means of learning opencore, instead of trying to understand the full-featured mediaserver, things will be much easier. We can find out the simplest way to initialize opencore and play a file. For any specific requirement we need to implement, we can always find a corresponding test case in the unit test guide and refer to its source code.

How to debug opencore with gdb
Before we use gdb to debug unit testing application, we need to be aware of a helpful gdb feature: show real type of a object though pointer.
In opencore framework, it always manipulate a concrete object through an interface or base pointer. So, during debugging, we often get lost about what the actual type of the object being pointed to by the pointer is. Gdb can print the real type of object if the pointer points to it has virtual table. This feature can be turned on with "set print object" command. 
For example, if we break at the line returns a pointer in PVPlayerNodeRegistry::CreateNode function, we issue "p nodeInterface" command without print object turning on, we see:
$1 = (class PVMFNodeInterface *) 0x83c65c0
The type of the pinter is shown as PVMFNodeInterface, which isn't very informative because is the base type. If we trun print object on and run the command again, we see:
$2 = (PVMFMP4FFParserNode *) 0x83c65c0
The real type of the object is clearly printed. Very useful feature for debugging complex frameworks.
We can follow below steps to compile and debug unit testing application:
  1. Compile the app by following instructions in quick_start.txt
  2. cd to {open_core_root}/build_config/opencore_dynamic/build/pe_test. We need to start debugging here, otherwise the application may fail to find necessary libraries and media files.
  3. export LD_LIBRARY_PATH=../installed_lib/linux
  4. gdb ../bin/linux/pvplayer_engine_test
  5. set desired breakpoints
  6. run -source test.mp4 -test 1 1. The source and test case number argument can be changed accordingly.

Jumat

android touch event summary

In "implement drag and drop on android", I wrote the rules how touch event can be passed to the touched view's parent, and how a parent can intercept the touched view's event. On a device without mouse, Click and LongClicked events are also strongly related to touch event. So, I'll summarize how they are related.

  1. Button widget doesn't bubble event. If a button is touched, it doesn't pass the event to its parent in any case. (There should be more widgets exhibit this character.)
  2. Touch event doesn't bubble up to parent if the widget also registers Click or LongClick event handler.
  3. If a widget registers both Touch and Click event handler, Click event fires only when Touch event handler returns false. In other words, Click event gets fired only when touch event handler declares it's not interested in the touch event.
  4. If a widget registers both Click and LongClick event handler, and LongClick event get fired. Click event will be fired only if LongClick event handler returns false.

Testing Code:
http://code.google.com/p/rxwen-blog-stuff/source/browse/trunk/android/touch_events/

understanding drawBitmapMesh on android

The Canvas.drawBitmapMesh method on android is a like a mystery to me while I looked at the BitmapMesh sample. Though I tried to get some hints from the official document, it didn't help much. After played it with several tests, I got some ideas about how it worked.

A metaphor

The effect of drawBitmapMesh can be thought as pinching a point of an elastic canvas, and pull it to another point. The distorted image is very similar to what we shall get through drawBitmapMesh. Like the figures below show.


How the mesh affects the bitmap
The bitmap to be drawn is divided into equal size blocks. And the division is defined by the mesh, which is a float array. The array defines the lines that divide the bitmap. To have a division of W*H blocks, there needs to be (W+1)*(H+1) lines. These lines intersect at (W+1)*(H+1) points. Every two consecutive elements in the array corresponds to the x coordinate and y coordinate of an intersection. So, the mesh array comprises of 2*(W+1)*(H*1) elements. Given the bitmap's size is known, the drawing engine can find out the x and y coordinates of intersections by dividing the width or height of the image to W or H, respectively. So, if the x and y coordinates of an intersection supplied in the mesh doesn't equal to its intact values, the drawing engine will "pinch and pull" the intersection from its original location to the location we define.
Keep in mind that for a intersection that deviates its original location, only those four blocks that around it will be affected. All other blocks that are more than one blocks away from the intersection will remain intact.

Minggu

looper and handler in android

It's widely known that it's illegal to update UI components directly from threads other than main thread in android. This android document (Handling Expensive Operations in the UI Thread) suggests the steps to follow if we need to start a separate thread to do some expensive work and update UI after it's done. The idea is to create a Handler object associated with main thread, and post a Runnable to it at appropriate time. This Runnable will be invoked on the main thread. This mechanism is implemented with Looper and Handler classes.

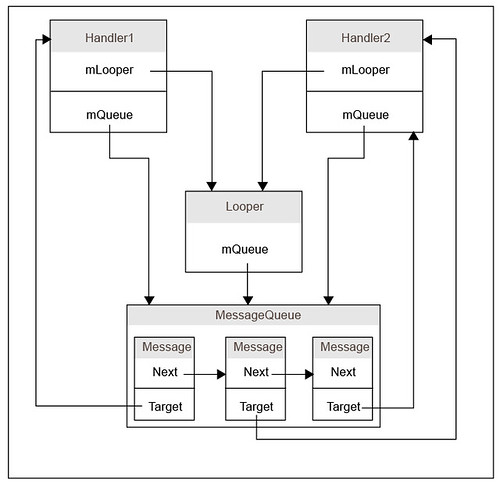
The Looper class maintains a MessageQueue, which contains a list messages. An important character of Looper is that it's associated with the thread within which the Looper is created. This association is kept forever and can't be broken nor changed. Also note that a thread can't be associated with more than one Looper. In order to guarantee this association, Looper is stored in thread-local storage, and it can't be created via its constructor directly. The only way to create it is to call prepare static method on Looper. prepare method first examines ThreadLocal of current thread to make sure that there isn't already a Looper associated with the thread. After the examination, a new Looper is created and saved in ThreadLocal. Having prepared the Looper, we can call loop method on it to check for new messages and have Handler to deal with them.
As the name indicates, the Handler class is mainly responsible for handling (adding, removing, dispatching) messages of current thread's MessageQueue. A Handler instance is also bound to a thread. The binding between Handler and Thread is achieved via Looper and MessageQueue. A Handler is always bound to a Looper, and subsequently bound to the thread associated with the Looper. Unlike Looper, multiple Handler instances can be bound to the same thread. Whenever we call post or any methods alike on the Handler, a new message is added to the associated MessageQueue. The target field of the message is set to current Handler instance. When the Looper received this message, it invokes dispatchMessage on message's target field, so that the message routes back to to the Handler instance to be handled, but on the correct thread.
The relationships between Looper, Handler and MessageQueue is shown below:

This design is very similar to win32's message loop. The benefit of this design is that we no longer need to worry about concurrency issues while manipulating UI elements because they are guaranteed to be manipulated on the same thread. Without this simplicity, our code may bloat heavily because we have to lock access to UI elements whenever they are possibly accessed concurrently.

The example at the end of this post shows how to send messages to different handlers associated with main Looper (Main Looper is created via prepareMainLooper in ActivityThread.main).

Example:
http://code.google.com/p/rxwen-blog-stuff/source/browse/trunk/android/looper_and_handler/

Kamis

implement drag and drop on android

Nowadays, drag and drop is a frequently seen feature on touch screen devices. Tthis post introduces the basic idea of how to implement drag and drop on android.

On android, touch event is composed of a series events.
First, user puts his finger on an element, and the element receives a ACTION_DOWN event.
Then, while holding finger on screen, user moves his finger to a new location. The element receives a series of ACTION_MOVE events.
Finally, user raises his finger. At this point, the element receives ACTION_UP event.
Consider the figure below, the parent element has a child element inside. User can drag the child element anywhere in parent.

There are two important traits of touch event on android.
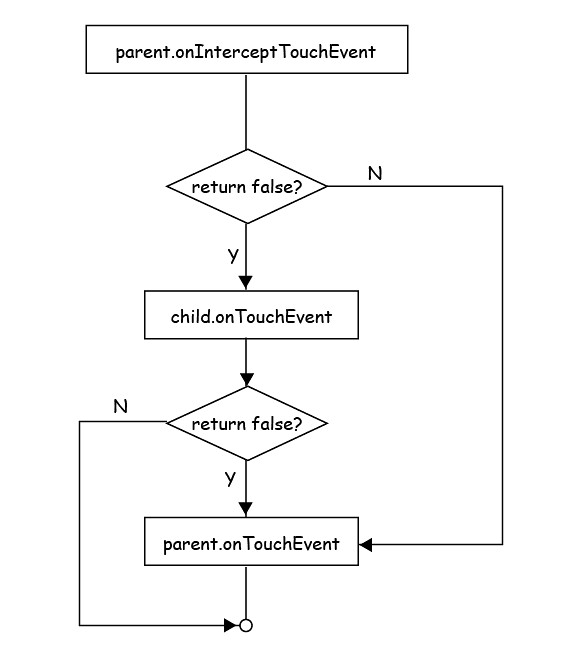
First, touch event will be propagated. That is, if a child chooses to ignore the first event (ACTION_DOWN) by returning false in its onTouchEvent handler, the parent's onTouchEvent handler will receive the event. Unless one of the ancestors agrees to handle the event or the root is reached, the event will continually be propagated.
Second, parent can intercept the touch event before its child's onTouchEvent handler is fired. This is achieved by overriding the onInterceptTouchEvent method on parent, and returning true from it. As a consequence, the child's onTouchEvent handler will be bypassed, and the parent's onTouchEvent handler will fire.
The work flow is shown in below diagram:


We need to setup the onTouchEvent handler for both child and parent. In child's handler, we save the child element as the item to be dragged, and return false so that subsequent event will be delivered to parent's handler. In parent's handler, we change the child's margin to match the position of the finger, so the child will follow our finger.

Sample code:
http://code.google.com/p/rxwen-blog-stuff/source/browse/#svn/trunk/android/drag

Reference:
http://developer.android.com/guide/topics/ui/ui-events.html

Jumat

use ffmpeg to setup streaming server on android

ffmpeg is a powerful media library. It provides ffserver tool that can be used to setup a streaming server.
Here is how to compile ffmpeg for android, using CodeSourcery's cross compiler.

1. Download and extract ffmpeg source code.
2. Use below commands to compile ffmpeg
./configure --arch=arm --cross-prefix=arm-none-linux-gnueabi- --extra-ldflags=-static --target-os=linux
make
3. Run file ffserver && readelf ffserver -d  or  arm-none-linux-gnueabi-objdump ffserver -x | grep NEEDED commands  to make sure ffserver is statically linked
4. Transfer ffserver tool, ffserver.conf file (defines what media files will be served by ffserver) and media files to android with adb push command
5. Start streaming server with ./ffserver -f ffserver.conf on andoird shell

Below is a sample ffserver.conf file, which tells the ffserver to listen on rtsp port 7654. It defines two media files for streaming, /data/1.mp3 and /data/1.mp4, respectively. So make sure these files exist.


# Port on which the server is listening. You must select a different
# port from your standard HTTP web server if it is running on the same
# computer.
Port 8090

# Address on which the server is bound. Only useful if you have
# several network interfaces.
BindAddress 0.0.0.0

# Port on which the server is listening. You must select a different

# port from your standard HTTP web server if it is running on the same

# computer.

RTSPPort 7654


# Address on which the server is bound. Only useful if you have

# several network interfaces.

RTSPBindAddress 0.0.0.0


# Number of simultaneous requests that can be handled. Since FFServer

# is very fast, it is more likely that you will want to leave this high

# and use MaxBandwidth, below.

MaxClients 1000


# This the maximum amount of kbit/sec that you are prepared to

# consume when streaming to clients.

MaxBandwidth 1000


# Access log file (uses standard Apache log file format)
# '-' is the standard output.
CustomLog -

# Suppress that if you want to launch ffserver as a daemon.
NoDaemon

<Stream 1.mp4>
Format rtp
File "/data/1.mp4"
</Stream>

<Stream 1.mp3>
Format rtp
File "/data/1.mp3"
</Stream>

To test ffserver, we can start a media player that supports media streaming, and open the url: rtsp://{ip address of the android device}:7654/1.mp3.

Minggu

streaming audio on android

Streaming media refers to the capability of playing media data while the data is being transferred from server. The user doesn't need to wait until full media content has been downloaded to start playing. In media streaming, media content is split into small chunks as the transport unit. After the user's player has received sufficient chunks, it starts playing.
From the developer's perspective, media streaming is comprised of two tasks, transfer data and render data. Application developers usually concentrate more on transfer data than render data, because codec and media renderer are often available already.
On android, streaming audio is somewhat easier than video for android provides a more friendly api to render audio data in small chunks. No matter what is our transfer mechanism, rtp, raw udp or raw file reading, we need to feed chunks we received to renderer. The AudioTrack.write function enables us doing so.
AudioTrack object runs in two modes, static or stream. In static mode, we write the whole audio file to audio hardware. In stream mode, audio data are written in small chunks. The static mode is more efficient because it doesn't have the overhead of copying data from java layer to native layer, but it's not suitable if the audio file is too big to fit it memory. It's important to notice that we call play at different time in two modes. In static mode, we must call write first, then call play. Otherwise, the AudioTrack raises an exception complains that AudioTrack object isn't properly initialized. In stream mode, they are called in reverse order. Under the hood, static and stream mode determine the memory model. In static mode, audio data are passed to renderer via shared memory. Thus static mode is more efficient.

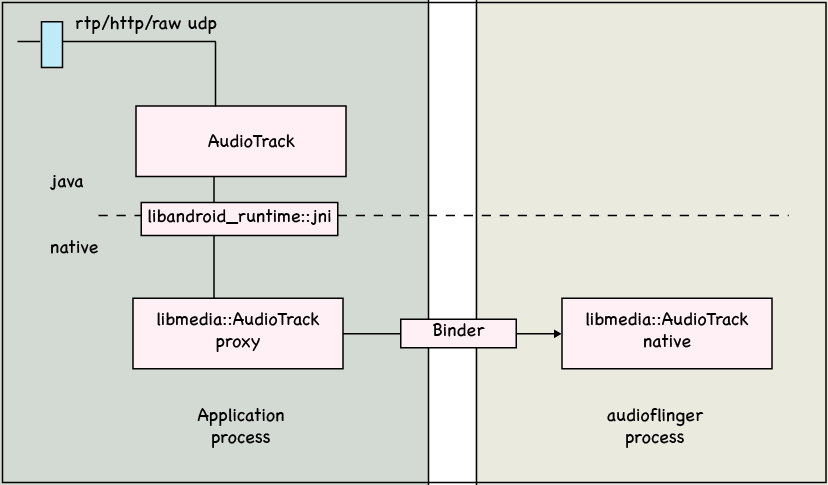
From birds eye view, the architecture of an typical audio streaming application is:

Our application receives data from network. Then the data will be passed to a java layer AudioTrack object which internally calls through jni to native AudioTrack object. The native AudioTrack object in our application is a proxy that refers to the implementation AudioTrack object resides in audioflinger process, through binder ipc mechanism. The audiofinger process will interact with audio hardware.
Since our application and audioflinger are separate processes, so after our application has written data to audioflinger, the playback will not stop even if our application exits.

AudioTrack only supports PCM (a.k.a G.711) audio format. In other words, we can't stream mp3 audio directly. We have to deal with decoding ourselves, and feed decoded data to AudioTrack.

Sample
http://code.google.com/p/rxwen-blog-stuff/source/browse/trunk/android/streaming_audio/
For demonstration purpose, this sample chooses a very simple transfer mechanism. It reads data from a wav file on disk in chunks, but we can consider it as if the data were delivered from a media server on network. The idea is similar.


Update: Check this post for a more concrete example.

Senin

native programming with android building system

In the previous post, native programming on android, I showed how to use code sourcery toolchain to do native programming on android. But in that way, we must link c library statically into our application, which is not desirable. So, in this post, I'll show how to do native programming with the android built-in building system.

For demonstration purpose, I'll create a logtest application. The application relies on cutils lib and writes some log information that can be examined through "adb logcat" command.

1. Initialize android source tree
In later steps, I'll use $ANDROID_SRC to refer to the root of the android source tree.

2. Create a directory for your application within the source tree
One advantage of android building system is it doesn't require your application to follow a specific organization structure. Your application can be placed in any directory. I created $ANDROID_SRC/logtest folder for the application.

3. Create an Android.mk file for the application in the directory
Android.mk is a reserved file name to indicate a module. This file describes how to build the module. By defining LOCAL_MODULE variable, we can assign a name to our application.
Depending on the type of the module, we include $(BUILD_EXECUTABLE), $(BUILD_DYNAMIC_LIBRARY) and $(BUILD_STATIC_LIBRARY) respectively at the end of the Android.mk.

4. Specify source files for the application
Through LOCAL_SRC_FILES variable, we specifies which source files are necessary to compile the module. Paths to source files are represented relative to the location of the Android.mk file.

5. Specify dependencies
Through LOCAL_SHARED_LIBRARIES variable, we can specify other libraries that our module depends on.

6. Build application
Go to root of Android source tree, and type make $(LOCAL_MODULE) to build the application which will be placed at $ANDROID_SRC/out/target/product/generic/system/bin/logtest.


Tips:

1. show commands
By default, android building system disables command echoing. It's hard to find out and correct dependency relationships without seeing the actual command. To change this behavior, we can append the showcommands pseudo target.
For example:
make logtest showcommands

2. quick build
Android building system need to find and parse Android.mk files within the source tree, and analysis dependencies. It's a time consuming task. In fact, there is a quicker way to build a module.
cd $ANDROID_SRC
source build/envsetup.sh
mmm {path_to_module_to_be_built} showcommands


3. build host module
Android building system can also used to generate modules for the host machine. An example is the adb application. To build host module, we can use:
include $(BUILD_HOST_EXECUTABLE) # $(BUILD_HOST_STATIC_LIBRARY)

4. disable prelink
We may encounter the error below while compiling a shared library:
build/tools/apriori/prelinkmap.c(168): library '***.so' not in prelink map
This is because android tries to prelink shared library with apriori tool by default, but our library isn't presented in the build/core/prelink-linux-arm.map. Thus the error. To get rid of it, we can add the line below in Android.mk to disable prelink.
LOCAL_PRELINK_MODULE := false

The demo can be found at:
http://code.google.com/p/rxwen-blog-stuff/source/browse/trunk/android/logtest/

Reference:
Android Building System
Android build system