Laman

New

a

Tampilkan postingan dengan label multimedia. Tampilkan semua postingan

Rabu

install h.264 plugin for linphone on ubuntu

h.264 plugin isn't a standard part of linphone installation on ubuntu. We must manually compile and install it.

1. Download msx264 plugin source code.
2. Run sudo apt-get install libmediastreamer-dev libx264-dev libavcodec-dev libswscale-dev libtheora-dev to meet msx264's dependency requirements.
3. Run ./configure --prefix=/usr/lib. It's mandatory to set prefix to /usr/lib, because linphone can't find the plugin if it's installed in default location, /usr/local/lib.
4. Run sudo make install.
5. Change the line 393 in src/msx264.c from


393     if (sws_scale(s->sws_ctx,(uint8_t * const*)orig->data,orig->linesize, 0,

to


393     if (sws_scale(s->sws_ctx,(uint8_t **)orig->data,orig->linesize, 0,

to get rid of compilation error, if you have.

6. Restart linphone, the h.264 plugin should be available now.

Senin

view raw yuv file with mplayer

mplayer is a powerful utility that is helpful for examining the raw yuv file.
We decoded this h.264 media file (test_avc_amr.mp4) coming with android opencore to yuv format, saved as a.yuv. The command below can display the yuv file frame by frame:
mplayer -demuxer rawvideo -rawvideo w=176:h=144:format=i420 a.yuv -loop 0

The internal structure of a.yuv is a serial of yuv frames, without any header describing the size and format.

So, to make mplayer work, we should tell it the width and height of the yuv in pixel. Also, we need to specify the format of the raw video. The command below shows us all available formats:
mplayer -rawvideo format=help

References:
mplayer manual page
mplayer online documentation

Rabu

learning opencore through unit testing

Android 2.3 gingerbread was officially released. A big improvement is this version is in media framework, as stated in platform highlights:

Media Framework

  • New media framework fully replaces OpenCore, maintaining all previous codec/container support for encoding and decoding.
  • Integrated support for the VP8 open video compression format and the WebM open container format
  • Adds AAC encoding and AMR wideband encoding

I'm not able to find out what is the replacement for opencore yet. But before opencore is obsoleted, I still would like to share my way of learning opencore. This might be helpful for those who still have to work on legacy android platforms.

Opencore is a complicated multimedia framework. An effective way I thought a bit easier to learn it is looking at its unit testing code and debugging unit testing application. The advantages include:
  1. The code can be compiled as x86 executable, so we can run it on our pc directly, rather than on a android device or emulator.
  2. The application can be debugged with gdb 
  3. Unit tests demonstrate the simplest usage of opencore. It's particularly useful for a fresh learner to get started.
  4. Test cases each have its own concentration, and is easier to follow.
So, if we use unit testing code as a means of learning opencore, instead of trying to understand the full-featured mediaserver, things will be much easier. We can find out the simplest way to initialize opencore and play a file. For any specific requirement we need to implement, we can always find a corresponding test case in the unit test guide and refer to its source code.

How to debug opencore with gdb
Before we use gdb to debug unit testing application, we need to be aware of a helpful gdb feature: show real type of a object though pointer.
In opencore framework, it always manipulate a concrete object through an interface or base pointer. So, during debugging, we often get lost about what the actual type of the object being pointed to by the pointer is. Gdb can print the real type of object if the pointer points to it has virtual table. This feature can be turned on with "set print object" command. 
For example, if we break at the line returns a pointer in PVPlayerNodeRegistry::CreateNode function, we issue "p nodeInterface" command without print object turning on, we see:
$1 = (class PVMFNodeInterface *) 0x83c65c0
The type of the pinter is shown as PVMFNodeInterface, which isn't very informative because is the base type. If we trun print object on and run the command again, we see:
$2 = (PVMFMP4FFParserNode *) 0x83c65c0
The real type of the object is clearly printed. Very useful feature for debugging complex frameworks.
We can follow below steps to compile and debug unit testing application:
  1. Compile the app by following instructions in quick_start.txt
  2. cd to {open_core_root}/build_config/opencore_dynamic/build/pe_test. We need to start debugging here, otherwise the application may fail to find necessary libraries and media files.
  3. export LD_LIBRARY_PATH=../installed_lib/linux
  4. gdb ../bin/linux/pvplayer_engine_test
  5. set desired breakpoints
  6. run -source test.mp4 -test 1 1. The source and test case number argument can be changed accordingly.

Jumat

use ffmpeg to setup streaming server on android

ffmpeg is a powerful media library. It provides ffserver tool that can be used to setup a streaming server.
Here is how to compile ffmpeg for android, using CodeSourcery's cross compiler.

1. Download and extract ffmpeg source code.
2. Use below commands to compile ffmpeg
./configure --arch=arm --cross-prefix=arm-none-linux-gnueabi- --extra-ldflags=-static --target-os=linux
make
3. Run file ffserver && readelf ffserver -d  or  arm-none-linux-gnueabi-objdump ffserver -x | grep NEEDED commands  to make sure ffserver is statically linked
4. Transfer ffserver tool, ffserver.conf file (defines what media files will be served by ffserver) and media files to android with adb push command
5. Start streaming server with ./ffserver -f ffserver.conf on andoird shell

Below is a sample ffserver.conf file, which tells the ffserver to listen on rtsp port 7654. It defines two media files for streaming, /data/1.mp3 and /data/1.mp4, respectively. So make sure these files exist.


# Port on which the server is listening. You must select a different
# port from your standard HTTP web server if it is running on the same
# computer.
Port 8090

# Address on which the server is bound. Only useful if you have
# several network interfaces.
BindAddress 0.0.0.0

# Port on which the server is listening. You must select a different

# port from your standard HTTP web server if it is running on the same

# computer.

RTSPPort 7654


# Address on which the server is bound. Only useful if you have

# several network interfaces.

RTSPBindAddress 0.0.0.0


# Number of simultaneous requests that can be handled. Since FFServer

# is very fast, it is more likely that you will want to leave this high

# and use MaxBandwidth, below.

MaxClients 1000


# This the maximum amount of kbit/sec that you are prepared to

# consume when streaming to clients.

MaxBandwidth 1000


# Access log file (uses standard Apache log file format)
# '-' is the standard output.
CustomLog -

# Suppress that if you want to launch ffserver as a daemon.
NoDaemon

<Stream 1.mp4>
Format rtp
File "/data/1.mp4"
</Stream>

<Stream 1.mp3>
Format rtp
File "/data/1.mp3"
</Stream>

To test ffserver, we can start a media player that supports media streaming, and open the url: rtsp://{ip address of the android device}:7654/1.mp3.

invisible directshow render window

A common task we may want to achieve while creating a media application is to start media playback on a new thread, as the sample below shows:
http://code.google.com/p/rxwen-blog-stuff/source/browse/trunk/multimedia/directshow/dbg_directshow_thread_issue/dbg_directshow_thread_issue.cpp
In the menu of the sample, there are two items. "Render File" will start playback on main thread of the application. "Render New Thread" will create a new thread to playback. Everything work fine in the first case, but in the second case, the directshow rendering window isn't visible, I can only hear sound.
Then I debugged the application with spy++. The image below shows all windows when the media is rendered on main thread. There is a VideoRenderer window exists on main thread.


In contrast, the image below shows all windows when the media is rendered on a new thread. The VideoRenderer window doesn't exist.


I added two lines of code at the end of Render method to block the new thread so it didn't exit after the media playback started. This time, the render window can be seen. All windows are shown below, in which the VideoRenderer window is there.


Actually, the issue has to do with windows working mechanism. A window's window procedure executes on the thread that creates the window. If the corresponding thread ends, the window will also end. That's why we have to keep the new thread from exiting to keep the VideoRenderer window alive.

[quotation from programming windows by Charles Petzold]
Although Windows programs can have multiple threads of execution, each thread's message queue handles messages for only the windows whose window procedures are executed in that thread. In other words, the message loop and the window procedure do not run concurrently. When a message loop retrieves a message from its message queue and calls DispatchMessage to send the message off to the window procedure, DispatchMessage does not return until the window procedure has returned control back to Windows.
However, the window procedure could call a function that sends the window procedure another message, in which case the window procedure must finish processing the second message before the function call returns, at which time the window procedure proceeds with the original message. For example, when a window procedure calls UpdateWindow, Windows calls the window procedure with a WM_PAINT message. When the window procedure finishes processing the WM_PAINT message, the UpdateWindow call will return controls back to the window procedure.
This means that window procedures must be reentrant. In most cases, this doesn't cause problems, but you should be aware of it. For example, suppose you set a static variable in the window procedure while processing a message and then you call a Windows function. Upon return from that function, can you be assured that the variable is still the same? Not necessarily—not if the particular Windows function you call generated another message and the window procedure changes the variable while processing that second message. This is one of the reasons why certain forms of compiler optimization must be turned off when compiling Windows programs.
In many cases, the window procedure must retain information it obtains in one message and use it while processing another message. This information must be saved in variables defined as static in the window procedure, or saved in global variables.
[/quotation]

When working with directshow, it's not necessary to create a new thread explicitly. It's fine to start playback on main thread because the main thread won't be blocked.

Minggu

streaming audio on android

Streaming media refers to the capability of playing media data while the data is being transferred from server. The user doesn't need to wait until full media content has been downloaded to start playing. In media streaming, media content is split into small chunks as the transport unit. After the user's player has received sufficient chunks, it starts playing.
From the developer's perspective, media streaming is comprised of two tasks, transfer data and render data. Application developers usually concentrate more on transfer data than render data, because codec and media renderer are often available already.
On android, streaming audio is somewhat easier than video for android provides a more friendly api to render audio data in small chunks. No matter what is our transfer mechanism, rtp, raw udp or raw file reading, we need to feed chunks we received to renderer. The AudioTrack.write function enables us doing so.
AudioTrack object runs in two modes, static or stream. In static mode, we write the whole audio file to audio hardware. In stream mode, audio data are written in small chunks. The static mode is more efficient because it doesn't have the overhead of copying data from java layer to native layer, but it's not suitable if the audio file is too big to fit it memory. It's important to notice that we call play at different time in two modes. In static mode, we must call write first, then call play. Otherwise, the AudioTrack raises an exception complains that AudioTrack object isn't properly initialized. In stream mode, they are called in reverse order. Under the hood, static and stream mode determine the memory model. In static mode, audio data are passed to renderer via shared memory. Thus static mode is more efficient.

From birds eye view, the architecture of an typical audio streaming application is:

Our application receives data from network. Then the data will be passed to a java layer AudioTrack object which internally calls through jni to native AudioTrack object. The native AudioTrack object in our application is a proxy that refers to the implementation AudioTrack object resides in audioflinger process, through binder ipc mechanism. The audiofinger process will interact with audio hardware.
Since our application and audioflinger are separate processes, so after our application has written data to audioflinger, the playback will not stop even if our application exits.

AudioTrack only supports PCM (a.k.a G.711) audio format. In other words, we can't stream mp3 audio directly. We have to deal with decoding ourselves, and feed decoded data to AudioTrack.

Sample
http://code.google.com/p/rxwen-blog-stuff/source/browse/trunk/android/streaming_audio/
For demonstration purpose, this sample chooses a very simple transfer mechanism. It reads data from a wav file on disk in chunks, but we can consider it as if the data were delivered from a media server on network. The idea is similar.


Update: Check this post for a more concrete example.

Override CheckMediaType with care

A problem I encountered while developing my source filter's output pin is that inside FillBuffer method, the media type and size of the media sample is not exactly the same as the one I proposed in GetMediaType method. The strange thing is my pin has successfully negotiated with downstream renderer filter (its actual type is Video Mixing Renderer-9 filter), and its input pin has agreed to use the media type my filter proposed. So why the actual media type being used changes?

The answer lies in this document, handling format changes from the video renderer:

Video Mixing Renderer Filter
The Video Mixing Renderer filter (VMR-7 and VMR-9) will connect with any format that is supported by the graphics hardware on the system. The VMR-7 always uses DirectDraw for rendering, and allocates the underlying DirectDraw surfaces when the upstream filter connects. The VMR-9 always uses Direct3D for rendering, and allocates the underlying Direct3D surfaces when the upstream filter connects.
The graphics hardware may require a larger surface stride than the image width. In that case, the VMR requests a new format by calling QueryAccept. It reports the surface stride in the biWidth member of the BITMAPINFOHEADER in the video format. If the upstream filter does not return S_OK from QueryAccept, the VMR rejects the format and tries to connect using the next format advertised by the upstream filter. The VMR attaches the media type with the new format to the first media sample. After the first sample, the format remains constant; the VMR will not switch formats while the graph is running.

During the connecting phase, after both filters' pins have agreed on a media type, they perform allocator negotiation. And the downstream pin proposed a larger biWidth during allocator negotiation. As a result to the new proposal, our pin's QueryAccept method is called. If we don't override it, the default implementation of grandpa class CBasePin comes into play. CBasePin::QueryAccept internally calls CheckMediaType method to see if the newly proposed media type can be accepted. Because our pin's CheckMediaType method's original implementation is too sloppy without examining all fields of the new media type, so we ended in the situation I described at the beginning of the post.

So, the best practice for creating a source filter is we need to handle CheckMediaType carefully. Or we can take the alternative way of overriding the QueryAccept method to handle media type change explicitly.

References:
How to Write a Source Filter for DirectShow
Core Media Technology in Windows XP Empowers You to Create Custom Audio/Video Processing Components

Thoughts on directshow

In this post, I'll summarize some features that make directshow stand out, from a developer's point of view.

The architecture of directshow is:

The core of directshow framework is the box in the center.

1. separation of concerns
Directshow divides a complex media rendering task into a bunch of smaller tasks, organized as different filters. Each filter has its own concentration, e.g., grabbing data from source media file, decoding data, rendering the data on display. It's more natural and easier for our brain to resolve complex problems in smaller steps, one by one. Another benefit of this breakdown structure is we can perform unit test on smaller component more easily.

2. mature abstraction layer
Directshow provides a mature abstraction layer on top of sub-tasks' concrete implementations (Adapter pattern). The existence of the abstraction layer makes our project easier to manage. The cost for dealing with changes can be minimized. For example, we can have one guy tries to implement a hardware based decoder filter. And before his filter is available, other guys in charge of other parts can use a software based decoder filter instead. After the hardware based filter is done, it's hopeful to replace the software based filter without requiring changes on other parts because interfaces of both filters are the same.

3. built-in multimedia functions
Besides being a sophisticated core framework, directshow also contains a lot of commonly used multimedia features like common media type decoders, some splitters, and multi-stream synchronizer. With these features built-in, we developers' life will be a lot easier.

References
MSDN: Directshow System Overview
http://en.wikipedia.org/wiki/DirectShow

Jumat

directshow debugging tips

1. View graph
When we render a media file, directshow uses intelligent connect to build a working graph for us. It may add some filters implicitly if necessary. From my perspective, it all happens transparently. It's user friendly and powerful. But while debugging, we need to know exactly how is the graph constructed and connected, at runtime. Directshow provided a utility method AddGraphToRot in %WINSDK%\Samples\multimedia\directshow\common\dshowutil.h. We can use it to register our graph to running object table, and then view the graph in graphedit. After the graph has been registered, we select File - Connect to Remote Graph in graphedit to bring up remote filter graph list. Then select the registered graph to view.


2. Keep log
IGraphBuilder exposes a SetLogFile method that can be used to specify a log file. Once set, all of the graph's activities will be saved to the log file, including how filter's are connected, how the graph attempted to connect pins. These information are valuable for debugging filters.
pGraph->SetLogFile((DWORD_PTR)CreateFile(TEXT("C:\\graph_builder.log"), GENERIC_WRITE, 0, NULL, CREATE_NEW, FILE_ATTRIBUTE_NORMAL, NULL));

3. Dump graph
In the log file generated by graph, components (filter and pin) are identified with their address in memory. The friendly name of the component isn't shown which make the log file harder to understand by human. Here is a small utility function that dumps all filters and their pins with corresponding memory address and name, in the format shown below.

Senin

understanding the android media framework

android media framework is built on top of a set of media libraries, including OpenCORE, vorbis and sonivox. So one of goal of android media framework is to provide a consistent interface for all services provided by underlying libraries and make them transparent to users.

The figure below shows the dependency relationships between libraries of the media framework.

android_media_lib_dep

In this figure, green components are media libraries, yellow components are android internal libraries, grey components are external libraries, and the light blue class is the java consumer of the media framework. Except for android.media.MediaPlayer class, all components are implemented in c or c++.

The core of the media framework is composed of libmedia, libmediaplayerservice and libmedia_jni. Their codes reside in frameworks/base/media folder.

libmedia defines the inheritance hierarchy and base interfaces. It’s the base library.

libmedia_jni is the shim between java application and native library. First, it implements the JNI specification so that it can be used by java application. Second, it implements the facade pattern for the convenience of caller.

libmediaplayerservice implements some of concrete players and the media service which will manage player instances.


The figure below shows the class hierarchy.android_media_classes

This is a simplified version of the class hierarchy. Only some core classes are included. Classes in blue are defined in libmedia, classes in green are defined in libmediaplayerservice, classes in light yellow are defined in binder, which implements the IPC on android. And classes in grey are defined in other libs.

Note the BpInterface and BnInterface are template classes. Any instantiation of them also inherit the template argument INTERFACE as well.

In the class hierarchy diagram, though listed as a separate module, binder is actually implemented inside libutils component whose source code locate at /frameworks/base/libs/utils folder.


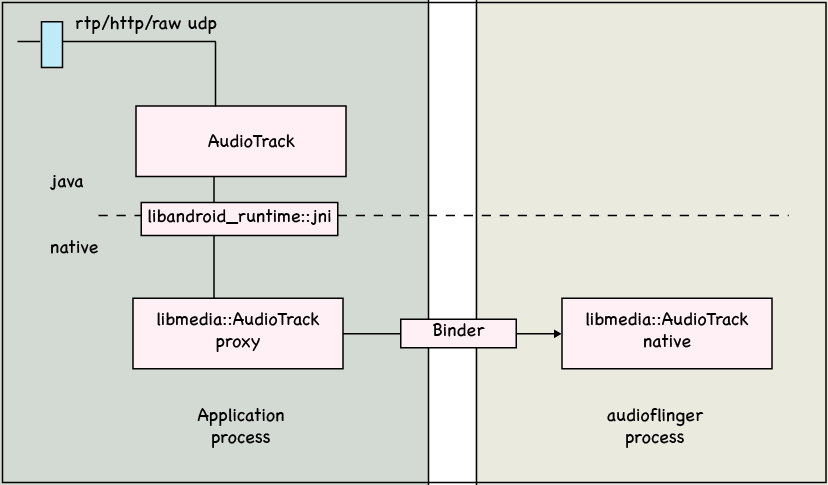
An interesting thing to note is in android, the application that intends to show the media content and the player that actually renders the media content run in different process. The red line in the sequence diagram below shows the boundary of two processes.

android_media_sequence

The figure shows three most common operations, creating a new player, setting datasource and playing. The last MediaPlayerBase object is the interface that MediaPlayerService::Client object uses to refer to the concrete player instance. The concrete player can be VorbisPlayer, PVPlayer, or any other player, depending on the type of the media to be played.

When an application creates a android.media.MediaPlayer object, it’s actually holding a proxy which can be used to manipulate the concrete player resides in the mediaserver process. During the whole procedure, two process communicates with Binder IPC mechanism.


Having knowledge above, it’s not difficult to understand why MediaPlayer doesn’t provide an API to use memory stream as source. Because the memory manipulated by the stream is in the address space of the application, and it’s not directly accessible by the mediaserver process.

References:

Google I/O, Mastering the Android Media Framework

android media framework uml diagram