Laman

New

a

Tampilkan postingan dengan label android. Tampilkan semua postingan

Kamis

android property system

Property system is an important feature on android. It runs as a service and manages system configurations and status. All these configurations and status are properties. A property is a key/value pair, both of which are of string type.
From the sense of function, it's very similar to windows registry. Many android applications and libraries directly or indirectly relies on this feature to determine their runtime behavior. For example, adbd process queries property service to check if it's running in emulator. Another example is the java.io.File.pathSeparator returns the value stored in property service.

How property system works
The high level architecture of property system is shown as following.
android prop sys arch
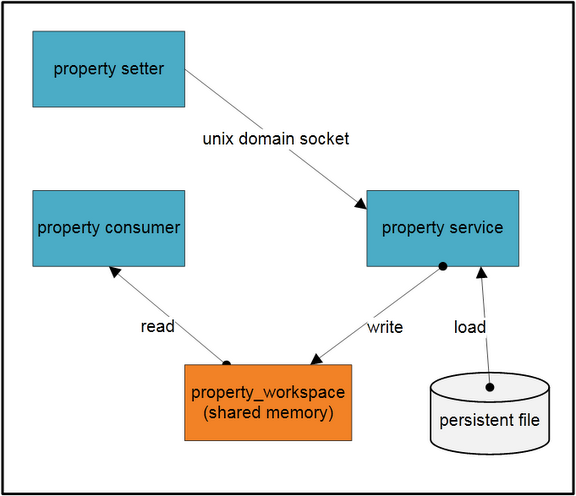
In the figure, there are three processes, a group of persistent property files and a shared memory block. The shared memory block is the container of all property records. Only the property service process can write to the shared memory block. It'll load property records from persistent the save them in the shared memory.
The consumer process loads the shared memory in its own virtual space and access properties directly. The setter process also loads the shared memory in its virtual space, but it can't write to the memory directly. When the setter tries to add or update a property, it sends the property to property service via unix domain socket. The property service will write the property to shared memory on behalf of the setter process, as well as to the persistent file.

Property service runs inside init process. The init process first creates a shared memory region and stores a fd to the region. Then init process maps the region into its virtual space with mmap with MAP_SHARED flag, as a result, any updates to this area can be seen by all processes. This fd and region size are saved in a environment variable named "ANDROID_PROPERTY_WORKSPACE". Any other processes like consumer and setter will use this environment variable to get the fd and size, so that they can mmap this region into its own virtual space. The layout of the shared memory is shown below.
androi prop mem layout
After that, init process will load properties from following files:
/default.prop
/system/build.prop
/system/default.prop
/data/local.prop


The next step is start property service. In this step, a unix domain socket server is created. This socket's pathname is "/dev/socket/property_service" which is well known to other client processes.
Finally, init process calls poll to wait for connect event on the socket.

On the consumer side, when it initializes libc(bionic/libc/bionic/libc_common.c __libc_init_common function). It will retrieve the fd and size from environment variable, and map the shared memory into its own space(bionic/libc/bionic/system_properties.c __system_properties_init function). After that, libcutils can read property just as normal memory for the consumer.

Currently, properties can't be removed. That's to say, once a property has been added, it can't be removed, neither can its key be changed.

How to get/set properties

There are three main means to get/set properies on android.

1. native code
When writing native applications, property_get and property_set APIs can be used to get/set properties. To use them, we need to include cutils/properties.h and link against libcutils.

2. java code
Android also provides System.getProperty and System.setProperty functions in java library, our java application can use them to get/set properties.
But it's important to note that although these java APIs are semantically equal to native version, java version store data in a totally different place. Actually, a hashtable is employed by dalvik VM to store properties. So, java properties are separated, it can't get or set native properties, and neither vice versa.

Update: Andrew mentioned that android.os.SystemProperties class can manipulate native properties, though it's intended for internal usage only. It calls through jni into native property library to get/set properties.

3. shell script
Android provides getprop and setprop command line tool to retrieve and update properties. They can be used in shell script. They are implemented on top of libcutils.

Senin

understanding the android media framework

android media framework is built on top of a set of media libraries, including OpenCORE, vorbis and sonivox. So one of goal of android media framework is to provide a consistent interface for all services provided by underlying libraries and make them transparent to users.

The figure below shows the dependency relationships between libraries of the media framework.

android_media_lib_dep

In this figure, green components are media libraries, yellow components are android internal libraries, grey components are external libraries, and the light blue class is the java consumer of the media framework. Except for android.media.MediaPlayer class, all components are implemented in c or c++.

The core of the media framework is composed of libmedia, libmediaplayerservice and libmedia_jni. Their codes reside in frameworks/base/media folder.

libmedia defines the inheritance hierarchy and base interfaces. It’s the base library.

libmedia_jni is the shim between java application and native library. First, it implements the JNI specification so that it can be used by java application. Second, it implements the facade pattern for the convenience of caller.

libmediaplayerservice implements some of concrete players and the media service which will manage player instances.


The figure below shows the class hierarchy.android_media_classes

This is a simplified version of the class hierarchy. Only some core classes are included. Classes in blue are defined in libmedia, classes in green are defined in libmediaplayerservice, classes in light yellow are defined in binder, which implements the IPC on android. And classes in grey are defined in other libs.

Note the BpInterface and BnInterface are template classes. Any instantiation of them also inherit the template argument INTERFACE as well.

In the class hierarchy diagram, though listed as a separate module, binder is actually implemented inside libutils component whose source code locate at /frameworks/base/libs/utils folder.


An interesting thing to note is in android, the application that intends to show the media content and the player that actually renders the media content run in different process. The red line in the sequence diagram below shows the boundary of two processes.

android_media_sequence

The figure shows three most common operations, creating a new player, setting datasource and playing. The last MediaPlayerBase object is the interface that MediaPlayerService::Client object uses to refer to the concrete player instance. The concrete player can be VorbisPlayer, PVPlayer, or any other player, depending on the type of the media to be played.

When an application creates a android.media.MediaPlayer object, it’s actually holding a proxy which can be used to manipulate the concrete player resides in the mediaserver process. During the whole procedure, two process communicates with Binder IPC mechanism.


Having knowledge above, it’s not difficult to understand why MediaPlayer doesn’t provide an API to use memory stream as source. Because the memory manipulated by the stream is in the address space of the application, and it’s not directly accessible by the mediaserver process.

References:

Google I/O, Mastering the Android Media Framework

android media framework uml diagram

Selasa

communicate with service on android

While doing android programming, it's a common sense to use Activity to interact with users and use Service to perform time consuming tasks (actually, such tasks are usually performed on a new thread spawned by the service). A classic example is media player. It's composed of several Activities and a playing-back Service. Through Activities, users can pick a media file to play, or control (start, pause, fast forward, set volume, etc) the playing-back Service. And the Service is responsible for playing the media file. The service can run in background even no Activity of the player application is active. It's also possible that the Service is implemented and hosted in another application other than the one where Activities are implemented.
In order to allow Activities to control the behavior of the Service, there should be an mechanism to allow they talk to each other. And by following the Process Agnostic feature of Android platform, this communication mechanism should also be able to handle Inter-Process and Inside-Process communication consistently. Such that from the upper layer application code's point of view, it's making communications between components independent of which process these components run in.
Luckily, Android has already provided such a RPC mechanism which has been briefly introduced here: Android application fundamentails - remote procedure calls. And the document Designing a Remote Interface Using AIDL also shows a tutorial about how to perform RPC.
But the documents above don't include a complete yet simple example for us to follow, so I'd like to explore how to do Inside-Process as well as Inter-Process with an example.
This example is composed of two applications. The first application (app1) will bind to a service runs in another application (app2) when a button is clicked, thus demonstrates Inter-Process communication. app2 can bind to the service too, which demonstrates Inside-Process communication.

There are two buttons on each application's Activity. First, you need to click button titled start svc to bind to service and get a reference to Binder object. Then, you can click button titled call rpc to invoke a method in service.

It's trivial to repeat the tutorial of designing remote interface. So I'd like to just post some findings during my exploration.

  1. The onBind method of service should return a non-null IBinder. Otherwise, the callback function onServiceConnected won't be fired.
  2. Add two aidl interface with the same name to both projects (ISvcController.aidl in our example). And the interface can be used in both projects to manipulate the IBinder object returned by the service. These two interfaces can have different member functions, but any function to be used must have the same signature and be placed at the same place (index) in these interfaces.
  3. When access the service in the same process, the original IBinder returned in onBind method is passed to onServiceConnected callback method. When access the service in a different process, a proxy for the IBinder is passed to onServiceConnected callback method.
  4. It's necessary to call unbindService to avoid connection leaking. This can be done upon specific event handler such as a button click. A better choice is to unbind in one of Activity's life cycle events, for example, onStop. So that the connection will be freed no matter in which way the user leaves the Activity.

Source Code
browse code here:
http://code.google.com/p/rxwen-blog-stuff/source/browse/#svn/trunk/android/rpc-with-service
or via command:
svn co https://rxwen-blog-stuff.googlecode.com/svn/trunk/android/rpc-with-service

Kamis

main thread in android application

In android sdk document, it's mentioned that all components(Activity, Service, etc) run on the main thread. The main thread is the thread where our code works on.
Conventionally, when talk about a Service, we think it this way:
void service()
{
while(isRunning)
{
// do something
}
}
In other words, a service is usually implemented as a infinite loop. If this is the case for android service, how can it run with other components on the same thread simultaneously?
And think about activity. It has to listen for incoming events like clicking a button, which also implies the pattern of an infinite loop. So, it's also not possible for activity to coexist with other components in the same thread as well.
In fact, components don't have their own loop, instead, they share the same main loop which is implemented in Looper. This also explains why google strongly recommends not do any long-running tasks in a component's life cycle events. Say, if we run a procedure for a long time in onBind function of a service, the main thread won't have any chance to deal with new message in the loop until the procedure finishes. The best idea is to spawn a new thread to do the task and let the main thread back to the main loop as soon as possible.
Looper is the starting point of an application. It acts as the role of message loop. It loops forever waiting for incoming messages and dispatch messages to corresponding components to handle. Upon receiving a message, the corresponding handler object's dispatchMethod will be invoked.
So, in android, a component is a object with a state machine and is able to handle all kinds of messages.

Minggu

video player demo in android

In this post, I'll show some basic operations in android with a simple video player. The demo shows how to:

Use explicit intent
List video files with ListView, ContentProvider & MediaProvider
Retrieve data from another Activity with startActivityForResult
Play video file with VideoView

Basically, the demo is composed of two activities. The first activity (Main) is a video player with a button on it. When you click the button, the second activity(VideoSelector) shows and lists video files available on the device. Then, after you pick a video from the list, you return to Main activiry and it starts playing the video you selected.

1. Use explicit intent
On android, an intent can be implicit or explicit. An explicit intent clearly designates the component to start. Because explicit intent uses the name of target component, it's usually used inside an application. On contrast, implicit intent specifies desired action, and let the system to pick the best match component.
In our demo, we want to use the VideoSelector to select a video file, rather than the system built-in media selector, so we use explicit intent to start activity. To create explicit intent, we just need to pass the designated component class name to intent, as shown below.

Intent i = new Intent();
i.setClass(v.getContext(), VideoSelector.class);
startActivityForResult(i, 0);

The use of startActivityForResult will be explained later.

2. List video files
Android provides a ListActivity class to list data provided by a ContentProvider. We can take advantage of it to list video files available on current device rather than start from scratch. To use it, we simply make it the base class for our activity, meanwhile, add a ListView with id "@android:id/list" in the activity's layout. And the final thing we need to do is set the datasource for the list with setListAdapter method.
Android also provides a MediaProvider that can list all video files. It's the default provider when we use ContentResolver to query MediaStore.Video.Media.EXTERNAL_CONTENT_URI.

3. Get data from another activity & play video
After we select a video from the list, information of the video such as its path should be passed to the main activity for playing. The recommended way is passing it via intent object. Previously, we start the VideoSelector with startActivityForResult in Main. Being started this way, when the VideoSelector is finished, the onActivityResult method of Main will be fired. So, we need to store the selected video's path in the intent to be passed to Main. Then retrieve it in Main. As shown below:

@Override
protected void onListItemClick(ListView l, View v, int position, long id)
{ // in VideoSelector.java
String filePath = mCursor.getString(mCursor.getColumnIndex(MediaStore.Video.Media.DATA));
mCursor.moveToPosition(position);
Intent result = new Intent();
result.putExtra(FILE_PATH, filePath);
setResult(RESULT_OK, result);
finish();
}

@Override
protected void onActivityResult(int requestCode, int resultCode, Intent data) {
// in Main.java
super.onActivityResult(requestCode, resultCode, data);
if (RESULT_OK == resultCode) {
Bundle bd = data.getExtras();
String path = bd.getString(VideoSelector.FILE_PATH);
m_vvPlayer.setVideoPath(path);
m_vvPlayer.start();
}
}

To download full source code for this demo, you can download them from this page:
http://code.google.com/p/rxwen-blog-stuff/source/browse/#svn/trunk/android/mplayer
or with following svn command:
svn co https://rxwen-blog-stuff.googlecode.com/svn/trunk/android/mplayer

Rabu

adb for remote connections

The adb tool in android sdk is convenient utility for debugging and control android emulators. One of its powerful features is it can forward a tcp port on local machine to an emulator running on the same machine.
After you run the adb forward tcp:hostport tcp:emuport command, your android running in emulator can listen on emuport and communicate with external applications running on host machine. From the external application's point of view, it's connecting to hostport rather than emuport. The adb is responsible for forwarding messages between the two.
But adb has a limitation of only accepting connections from the same machine, you can't connect from a machine that adb isn't running on. This limitation makes it a little bit inconvenient to do network programming. Especially on windows, if you want to use wireshark to capture the packages between emulator and external app. By default, wireshark isn't able to capture loopback packages on windows. So, we change the behavior of adb to accept remote connections.
(Another way to overcome this is instead of capturing network package on host side, we can use tcpdump on emulator side. For example, use "/data/tcpdump -s 1500 -vv -w /data/net.pcap udp port 5060" to capture all packages for udp port 5060 and save them in /data/net.pcap file. The -s parameter specifies the size of each packet whose default value is 68, too small to get some useful information truncated. The /data/net.pcap file can also be examined with wireshark.)

How to modify adb behavior
If we run netstat command on host side, we can find out that adb server process binds to the loopback address. So it can't be accessed via external address.
The adb register a port forwarding information through install_listener function. And install_listener calls local_name_to_fd function to bind to a local address. Inside local_name_to_fd, it starts a tcp server through socket_loopback_server. To change this, we can use socket_inaddr_any_server which binds to all ipaddresses. In this way, the adb server can forward a request from remote machine to emulator.

How to compile
In order to get the modified adb, we need to compile it. To do so, we first need to download all of anroid's source code. Then, at the root of andoird source directory, run ./build/envsetup.sh. Finally, run make adb.

Downloads
http://rxwen-blog-stuff.googlecode.com/files/tcpdump.zip
http://rxwen-blog-stuff.googlecode.com/files/adb-linux.zip
http://rxwen-blog-stuff.googlecode.com/files/adb-windows.zip

Reference
howto build SDK

Update:
Modified adb v1.0.31 can be downloaded at: https://drive.google.com/#folders/0B9fylkYUFfYTTGJKN0tURzJFelE

Minggu

process agnostic feature

Being one of the most eye-catching terms today, android has many creative features. The most revolutionary one, in my opinion, is process agnostic. This is not a term used in official document, but I prefer to to use it since it implies this feature well enough.
One of center feature of android is the ability to easily make use of components of other applications. It's a common feature among many other systems, so how "easy" is android to distinguish it from others?
Let's first check out how others do. Generally, there are two common ways to reuse components. First, the component author can distribute the component as a library(e.g. dll, lib, so, a) that can be called by others. In this way, the reused component becomes part of the application that uses it.
android embedded componentThe second way is the shared component runs in a process, and the application wants to use it employs a IPC mechanism to communicate with the hosting process to make use of the component indirectly.
android ipcEither way, we programmers must know explicitly the way we're using. And we have to pay attention to or even control the life cycle of the hosting process.
Now let's look at what's different in android. In android, components reuse and collaboration are driven by Intent. Whenever you want to make use of another component, you need to create a intent object. And state your purpose by setting corresponding properties of the intent object. Then, you pass the intent to the application framework with startActivity, startService etc. Upon receiving an intent, the application framework determines the best component for processing the intent, and asks for the user if there are multiple components can handle the intent. After a component is identified for handling the intent, an instance of the component will run. The instance may resides in the same process or in a different process with the sender of the intent. From a user's perspective, this procedure is transparent. It doesn't make difference if the component is running in another process.
The coolest thing is android also achieves process agnostic feature for end user's experience. If you dismiss current activity, android guarantees you'll return to the previous activity you worked on. Consider the following scenario, application A is showing activity X. Then the user clicks a button on activity X and starts a new activity Y from application B which runs in a different process. If, we say, when the user is still working on activity Y, the process that application A runs in dies for some reason, the user doesn't get affected and can continue with his work until he dismiss activity Y. At this time, the ActityManager notices that activity X doesn't exist, and a new instance will be created and shown. The user will still see activity X as if nothing happened. But it's not guaranteed that activity X's state is maintained correctly unless we write code to persist and restore state at right time.
Needless to say, if components from different process need to talk to each, they still have to employ some kind of IPCs because android builds on linux and uses the same underlying process model. The great thing android does for us is it hides the IPC details from us so that we can use a consistent API with less concern about complicated IPC things.
Another benefit of this design is it'll be much easier to replace a component, even if the component is a system built-in one. For example, if your application declares an intent-filter for View action for contact, it will be considered as a valid replacement for built-in contacts application by the system. Our application isn't just a second-class citizen anymore.
The process agnostic feature ensures the openness of android, it also helps making components more loosely coupled to each other.
Besides what was mentioned, it's also important to notice that the process life cycle is managed by the system automatically. The process may still keep alive after the last activity of it has been dismissed. It's also possible that the process of an inactive activity that you haven't worked for a period of time but not yet closed is terminated by the system on demand for more resources for other processes. We know that .net framework is called a managed environment because it manages components and memories for us, android takes a larger step forward by managing process life cycle as well. In this sense, it's a super managed system.
Generally speaking, in android we mainly focus on the components and how they collaborate to accomplish our goal. Less concern need to be paid on the technology details that we can't easily ignore on other platforms.

Rabu

native and java performance on android

A lot of times when I saw someone heard that the main stream developing language on android platform is java, his first response would be "really? what about performance?". I've seen lots of similar responses when talking about c++ and c# on normal pc. Personally, I don't think argue about this question without a context makes any sense.
In most of situations, manged framework like c# and java suffice. How many times in your life do you have to implement a super powerful server that is capable of handling like one billion requests a time? Does the difference in performance really bother you? I don't think so. What play more important roles are: elegance, maintainability, clearness and number of bugs. And in a lot of situations, managed framework run at commensurate speed with c/c++ code. At least their order of growth are at the same level.
Back to the question itself. Is there significant performance difference between native and java code on android? Just see in action. The ensuing two code snippets will calculate the sum from 1 to 10,000 for 10,000 times in c and java respectively.


1 #include
2 #include
3
4 int main ( int argc, char *argv[] )
5 {
6 int i = 0, j = 0;
7 FILE *f = fopen("/data/perf_c.log", "a");
8
9 int rc = 0;
10
11 time_t t;
12 time(&t);
13 fprintf(f, "Start on: %s\n", ctime(&t));
14
15 for(i = 0; i < 10000; ++i)
16 {
17 for(j = 0; j < 10000; ++j)
18 rc += j;
19 rc = 0;
20 }
21
22 time(&t);
23 fprintf(f, "End on: %s\n", ctime(&t));
24 return 0;
25 } // ---------- end of function main ----------


1 package com.rmd;
2
3 import java.io.FileNotFoundException;
4 import java.io.FileOutputStream;
5 import java.io.PrintStream;
6 import java.text.SimpleDateFormat;
7 import java.util.Date;
8
9 import android.app.Activity;
10 import android.content.Context;
11 import android.os.Bundle;
12 import android.util.Log;
13
14 public class main extends Activity {
15 /** Called when the activity is first created. */
16 @Override
17 public void onCreate(Bundle savedInstanceState) {
18 Log.v("perf_test", "before loop");
19 try {
20 FileOutputStream fos = this.openFileOutput(
21 "perf_java.log", Context.MODE_APPEND);
22 int rc = 0, i, j;
23 PrintStream ps = new PrintStream(fos);
24 Date dt = new Date();
25 SimpleDateFormat sdf = new SimpleDateFormat("yyyy/MM/dd hh:mm:ss");
26 ps.printf("start on\t" + sdf.format(dt) + "\n");
27 for (i = 0; i < 10000; ++i) {
28 for(j = 0; j < 10000; ++j)
29 rc += j;
30 rc = 0;
31 }
32 dt = new Date();
33 ps.printf("end on\t\t" + sdf.format(dt) + "\n");
34 ps.close();
35 } catch (FileNotFoundException ex) {
36 Log.e("log_perf_test", "can't open file\n" + ex.getMessage());
37 }
38 Log.v("perf_test", "after loop");
39
40 super.onCreate(savedInstanceState);
41 setContentView(R.layout.main);
42 }
43 }


Having run these applications on android 1.5, we got following result:

start on: Wed Nov 11 12:13:51 2009
end on: Wed Nov 11 12:13:59 2009
total: 8 secs

start on 2009/11/11 09:12:30
end on 2009/11/11 09:13:27
total: 57 secs

The java app has been compiled in release mode for better optimization. And GC should not kick in since I only used auto variables in the sample. So I really didn't expect to see such a huge difference.
Though the performance diffs a lot, I still consider java to be the first priority choice when developing user applications. It has very convenient APIs, powerful presentation framework and great debugging support. And we still can turn to native code for extremely performance sensitive components which java can't satisfy. The official document also states that the performance of native method is 10-100X fater than java, and it suggests use native methods for performance optimization.

Selasa

logging in android

Android provides a set of powerful log utilities to make our developing life easier. If you've ever used the OutputDebugString function and the DebugView on windows, you'll find they works very similar to android's counterpart in the sense of user experience. We can start the application normally, then start DDMS at anytime we want to view the application's log message.
How to use the logging system
The android logging system defines a set of APIs to be used in our code. These functions have similar signature but different verbosity level.Only error, warning and info logs are always kept. Verbose and debug are intended for using in development stage only.
To use them, we just need to add a function call to Log API in the place in our code that we have interests with desired message. The first argument tag identifies the caller. It's a good practice to define a constant string for this tag. Use hard coded string within the function call directly makes our code harder to maintain.

Performance concern
The android logging system is so powerful and user friendly that we can easily make excessive use of it in our code. But does it bring any performance penalty to our application? Let's try out this with an experiment. The idea is pretty simple, we'll make a loop of 10,000 iteration and perform logging in each iteration. And we'll record the time before and after the loop in a log file (/data/data/package_name/files/log_perf.log).
The code snippet below does this. It exercises the logging loop each time we click on a button.

package com.rmd;

import java.io.FileNotFoundException;
import java.io.FileOutputStream;
import java.io.PrintStream;
import java.text.SimpleDateFormat;
import java.util.Date;

import android.app.Activity;
import android.content.Context;
import android.os.Bundle;
import android.util.Log;
import android.view.View;
import android.widget.Button;

public class main extends Activity {
/** Called when the activity is first created. */
@Override
public void onCreate(Bundle savedInstanceState) {
super.onCreate(savedInstanceState);
setContentView(R.layout.main);

Button btn = (Button) this.findViewById(R.id.btnGenerateLog);
btn.setOnClickListener(new View.OnClickListener() {

@Override
public void onClick(View v) {
System.gc();
try {
FileOutputStream fos = v.getContext().openFileOutput("log_perf.log",
Context.MODE_APPEND);
PrintStream ps = new PrintStream(fos);
Date dt = new Date();
SimpleDateFormat sdf = new SimpleDateFormat("yyyy/MM/dd hh:mm:ss");
ps.printf("start on\t" + sdf.format(dt) + "\n");
for (int i = 0; i < 10000; ++i) {
Log.v("log_perf_test", "hello raymond");
}
dt = new Date();
ps.printf("end on\t\t" + sdf.format(dt) + "\n");
ps.close();
} catch (FileNotFoundException ex) {
Log.e("log_perf_test", "can't open file\n" + ex.getMessage());
}
}
});
}
}

After we downloaded the apk file to the emulator, we'll run the application five times in different circumstances, with and without DDMS running to see if there is any difference.

-- DDMS turned off --
start on 2009/11/09 09:33:11
end on 2009/11/09 09:33:12
start on 2009/11/09 09:33:17
end on 2009/11/09 09:33:18
start on 2009/11/09 09:33:20
end on 2009/11/09 09:33:21
start on 2009/11/09 09:33:30
end on 2009/11/09 09:33:31
start on 2009/11/09 09:33:33
end on 2009/11/09 09:33:34

-- DDMS truned on --
start on 2009/11/09 09:33:59
end on 2009/11/09 09:34:02
start on 2009/11/09 09:34:05
end on 2009/11/09 09:34:08
start on 2009/11/09 09:34:11
end on 2009/11/09 09:34:14
start on 2009/11/09 09:34:17
end on 2009/11/09 09:34:20
start on 2009/11/09 09:35:06
end on 2009/11/09 09:35:10

-- /sbin/adbd killed --
start on 2009/11/09 09:35:53
end on 2009/11/09 09:35:54
start on 2009/11/09 09:35:57
end on 2009/11/09 09:35:59
start on 2009/11/09 09:36:01
end on 2009/11/09 09:36:02
start on 2009/11/09 09:36:05
end on 2009/11/09 09:36:06
start on 2009/11/09 09:36:08
end on 2009/11/09 09:36:09

From the log file above, we can see that the loop takes about 1 second to finish without DDMS running or having adbd process killed. And the loop takes about 3 seconds to finish if DDMS is running and capturing log message. On average, Log.v function runs at the level of tenth of millisecond. So, I tend to believe we don't need to bother much about performance penalty. It's more important to have correct logic and easier debugging facility.

Minggu

native programming on android

Besides programming with java, we're also able to do native programming with c or c++ on android platform.
To do so, we need a cross compiler target on arm processor for our working platform( windows or linux). So I downloaded Sourcery G++ Lite 2009q3-68 for ARM EABI, the tool chain for arm. If you're careful enough, you would have noticed my mistake which took me a day to figure out. Unfortunately, I downloaded the wrong tool chain. The correct one is Sourcery G++ Lite 2009q3-67 for ARM GNU/Linux. This toolchain is used for target platform that runs linux operating system. If I were patient enough to read the getting started guide for the toolchain, I would found out that the first toolchain is for platforms that don't have operating system, and the second one is for linux.
From the embarrassing story, you may tell I'm still a freshman on embedded system. Surely I am. In the last embedded project I worked on, there is already a toolchain and building system up and running built by my experienced colleagues. So I don't need to care about this. Anyway, this frustrating but finally success experience gains me a lot.

Ensuing content is about the steps to build and run hello world with the toolchain.
  1. download the right toolchain and extract the package
  2. add bin to path environment variable for easier access to the toolchain
  3. add below source code

  4.         #include    "stdio.h"

    int main ( int argc, char *argv[] )
    {
    printf("hello world!");
    return 0;
    } // ---------- end of function main ----------

  5. compile the code with arm-none-linux-gnueabi-gcc h.c -static. -static argument is necessary here because android uses a different c library with this toolchain. we must link the application statically against c lib, otherwise, the application will fail to run on android emulator.
  6. download the application to emulator with: adb push hello /data/
  7. log onto emulator with: adb shell
  8. add execution permission to the application with: chmod 777 /data/hello
  9. run the application /data/hello and we get desired output

Note, because we statically linked the c library so we used the c lib provided in the codesourcery arm toolchain rather than the custom Bionic c lib comes with ndk.


Update: native programming with android building system

Selasa

View android source code in eclipse

It's highly desired to be able to examine and debug into android framework source code. Eric Burke showed how he figured out where to put the source code so that ecplise will associate the android.jar with the corresponding source code. Unfortunately, it didn't work after I followed him step by step.
Then I turn to procmon for help.
First, I start eclipse. Then, run procmon and add a filter of process name equals eclipse.exe. After I captured the file system activities when I tried to view a android framework class's declaration which ends in not finding the corresponding file. I noticed there is a failure on the following path: android_sdk_installation_folder\platforms\android-1.5\sources . Here we go, this must be the correct place to put android source code.
So, the solution is:
1. Create a sources folder in android_sdk_installation_folder\platforms\android-1.5\
2. Copy everything in android_1.5_cupcake_src\frameworks\base\core\java\ to android_sdk\platforms\android-1.5\sources

It's very likely that Eric is using an older version of android sdk which has different file structure from my android sdk 1.6r1. Though his blog isn't totally accurate for current version, I still want to thank him for showing me the right way to go with his smartness.

Update:
The step 2 isn't a good way to organize java file because it only put framework's source code in place. The best tool I'm aware of is this python script by Damon Kohle. He improved the one provided by Michael and it will adjust the source code organization to fit eclipse's needs.

Senin

Beginning Android Development

Recently, I get start doing some development on android platform. Having skimmed through android sdk document, I find it’s a very interesting platform with a lot of new concepts compared to other platforms. So, I'd like to write a serial of blog entries to write my understandings down. This first post is about the basic tasks of setup the development environment.

Tools:

Tool


Description

Android SDK

Required

The essential development tool. It contains the building system, utilities and document.

Java SDK

Required


Eclipse with ADT plugin

Optional

It’s the officially recommended IDE to do android development.

The installation of these tools is quite straight forward. Actually, they all support copy and run. The only requirement is $(Java SDK installation folder)/jdk/bin is added to %PATH% environment variable. I also add $(android sdk installation foler)/tools to %PATH% for easier access to android tools.

How tools work collaboratively

The SDK document includes basic development tutorials for eclipse and other IDEs. The figure below illustrates how android tools work collaboratively to create project, generate executable file and download to device/emulator.

All involved tools can be divided into three categories, android common tools, android platform specific tools and java sdk tools. Android common tools are placed in $(android sdk installation folder)/tools directory, and can be used across different android versions. Android platform specific tools are placed in $(android sdk installation folder)/platforms/android-VERSION/tools directory, and are used for a specific platform version. Java sdk tools come with the jdk installation.

When working in Eclipse, the ADT plugin invokes these tools automatically and makes them transparent to developers so that we enjoy a smooth developing experience.

How debugging tools work

Being able to debug application on android platform is very essential. Android platform comes with a power debugging support on device/emulator. The DDMS tool works as the middleman between the debuggee running on device/emulator and debugger running on developing box. The architecture is:

The work flow is:

  1. DDMS connects to adb and starts device monitoring
  2. adb scans odd-numbered ports in range from 5555 to 5585 for new device and notifies DDMS it finds one
  3. DDMS starts VM monitoring for the new device
  4. adb discovers new VM and notifies DDMS
  5. DDMS retrieves process id via adb
  6. DDMS connects to the VM debugger through adb daemon(adbd) on the device
  7. debugging session starts
  8. DDMS opens a tcp port for receiving debugging commands and directs to the VM debugger

With knowledge above, we can issue below command to use the jdb debugger (contained in Java SDK) to perform debugging on a process.

jdb -connect com.sun.jdi.SocketAttach:hostname=localhost,port=8700

Before run this command, we must run DDMS process first.

Note that according to the example provided by jdb document, jdb can attach to a process in simpler form “jdb –attach 8700”. But when I did this on windows, I got the following error message:

java.io.IOException: shmemBase_attach failed: The system cannot find the file specified

It seems jdb is using shared memory other than socket, so I have to use the complex form.